This is#90DaysofDevopschallenge under the guidance of Shubham Londhe.
Day 28 Task
Introduction👍:
Today, let's talk about Jenkins agents, the powerhouse behind smooth job executions in Jenkins. We'll break down what they are and how to set them up in simple terms.
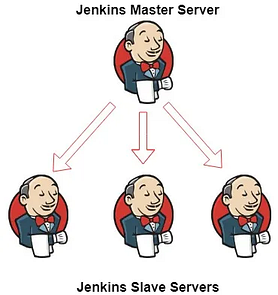
Jenkins Master (Server)
Think of the Jenkins master as the brains of the operation. It's the control center that manages all the tasks and workflows you set up in Jenkins.
From scheduling jobs to keeping an eye on their progress, the master server handles it all.
Jenkins Agent
Now, let's meet the Jenkins agent. It's like the muscle that gets things done. An agent can be a computer or a container that connects to the Jenkins master. Each agent has its own label, like a name tag, to help identify it.
When you tell Jenkins to run a job, the actual work happens on the agent you assigned to it.
As your team grows and you have more projects, you might need extra help. That's where "master to agent connection" comes in. It lets you add more agents to share the workload while the master keeps things organized.

Before You Begin
Before diving into agent setup, make sure your system has what it needs. For example, if you're starting fresh with Ubuntu 22.04, you'll need to install Java and Docker.
And remember, pay attention to user permissions when setting up agents.
Task-01: Setting Up an Agent
Start by creating a node on Jenkins to link your master and agent.
Get a new AWS EC2 instance and connect it to your Jenkins master.
Setting up the connection needs some tech stuff like SSH and keys.
Check that your new agent is up and running in Jenkins.
Steps:
1) Create EC2 instances as
Jenkins-Master
Jenkins-agent
When setting up the EC2 instance, make sure to install Jenkins and Java as well.


- In 'Jenkins-agent' instance install Jenkins, docker.

2)Generate SSH keys on “Jenkins-master” EC2 instance

You need to add the public key from the "Jenkins-master" instance to the "Jenkins-agent" instance in the file named ".ssh/authorized_keys".
Jenkins-master instance:

- Jenkins-agent instance:

- To create an agent on Jenkins:

Go to the Jenkins dashboard.
Click on "Manage Jenkins."

Then, click on "Manage Nodes and Clouds."

To create a new node, click on "New Node" on the left side of the page. This allows you to set up your first agent.


- Add details of your node, accordingly.

Choose "Launch agents via SSH" as the launch method. Enter the public IP of the agent in the "Host" field.
Click on “Add” under Credentials.

- Add private key that we created in 'Jenkins-master' instance using ssh-keygen.

- Click on 'save' to create the node. You'll see the agent connecting and coming online. Your agent is now ready for use.

- Our agent is launching.

Task-02
Run your previous jobs on the new agent.
To make this work, use labels for the agent so that your master server triggers build for the agent server.
Create a freestyle project: In Jenkins, click on "New Item," enter a name, choose "Freestyle project," and click Ok.
Fill in the description field.
Select "GitHub project" checkbox and enter your repository URL from where you will clone all files of your project.

- Navigate to your job's configuration. In the label expressions, add the label you assigned to your node.

Click on "Save," and your project will be associated with Agent-1.
Now, initiate a build for your project and check the console output for details.


If you liked what you read and found it helpful, please consider showing your support by following and giving a thumbs-up 👍 below.
Thanks for taking the time to read! Your feedback and support mean a lot. 💚
